Installation
Grablo IoT Core runs on Windows, macOS, and a wide range of Linux devices such as Raspberry Pi, Jetson, and Radxa. All installation files are available on the download page.
| Platform | Operating System | Architecture |
|---|---|---|
| Windows | Windows 10 1903 or later | x64 |
| macOS | macOS 14.4 (Sonoma) or later | Apple Silicon, Intel |
| Linux | Raspberry Pi OS, Ubuntu/Debian-based Linux | ARM64, x64 |
Supported single-board computers include Raspberry Pi 3/4/5 and Zero 2 W, NVIDIA Jetson (Nano, Orin Nano, AGX Orin), and Radxa Rock (5A, 5B, 5C, Zero 3W). Hardware is required to actually run projects, but projects can be created without it.
Windows and macOS
Download the installer (Windows: .exe, macOS: .pkg) from the download page, run it, and follow the instructions. Grablo starts automatically once installation completes.
Pre-installed Image (Raspberry Pi)
Write a Raspberry Pi OS image with Grablo pre-installed to an SD card. Grablo starts automatically as a system service on boot, making this the simplest option for first-time users. A full image with desktop and a CLI-only lite image are provided.
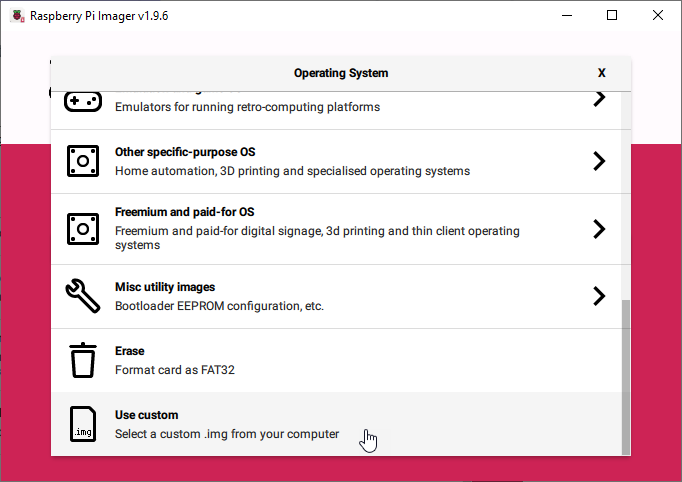
The downloaded image file (.img.xz) can also be written with general image writers such as balenaEtcher, but Raspberry Pi Imager is recommended because it lets you set up Wi-Fi and the user account while writing the card. The steps and screens below are based on Raspberry Pi Imager 1.9. Select Use custom in the operating system selection and choose the image file.
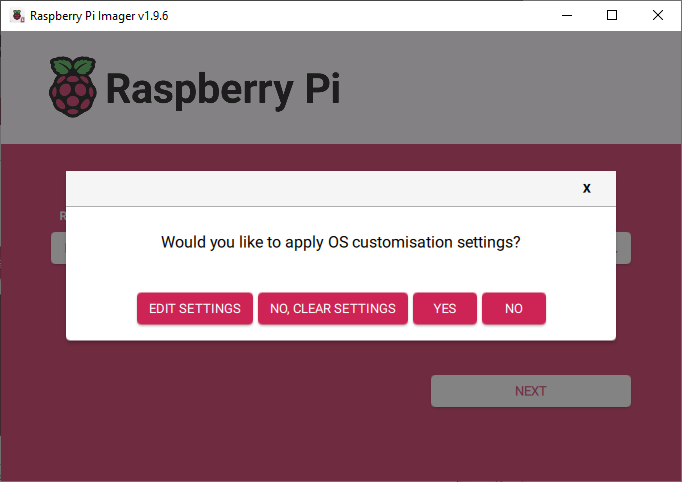
Under storage, select the SD card to write to and click Next. A dialog asks whether to apply OS customisation settings.
In this dialog, select Edit Settings to
pre-configure the hostname, user account, Wi-Fi, and locale. For a headless setup
without Ethernet, be sure to configure Wi-Fi. If you did not edit the settings, the default login is
grablo / grablo.
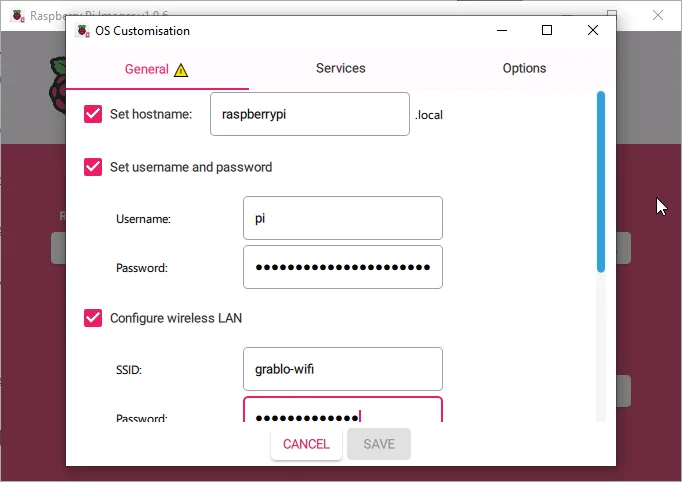
Enabling SSH on the Services tab lets you reach the device over the network without a monitor. When you are done, click Save, return to the OS customisation dialog, and click Yes. Confirm the warning that existing data on the SD card will be erased, and writing starts.
When writing completes, insert the SD card into the Raspberry Pi and connect the power. Grablo starts automatically as a system service on every boot, without requiring a login.
Home Assistant Add-on
On Home Assistant OS or Supervised, install Grablo as an add-on. The add-on connects to Home Assistant automatically, with no manual hardware setup.
-
In Home Assistant, open Settings > Apps > App store
and add
https://github.com/grablo/grablo-hass-addonsunder Repositories in the top-right menu. Clicking the button below opens the repository dialog directly. - Find Grablo IoT Core in the store and click Install.

The add-on has no UI of its own. After installing, connect to the device from the web app (app.grablo.co).
Docker
On mini PCs, NAS and other Docker hosts, install Grablo as a container. If you run Home Assistant OS or Supervised, the add-on above is recommended instead.
git clone https://github.com/grablo/grablo-docker.git
cd grablo-docker
docker compose up -d
Identity and data are kept in named volumes, so the container remains the same device
across updates and recreation. The container does not self-update; apply a new version
with docker compose pull followed by docker compose up -d.
See the install guide for details.
Direct Installation (.deb)
Users familiar with Linux can download the .deb package for their architecture
(ARM64/x64) and install it directly. On a desktop, open the .deb file from the file
manager to install it; from the command line, copy the package to the device and run
sudo apt install -y ./grablo*.deb. Once installed, Grablo starts as a
system service and launches automatically on boot, without requiring a login.